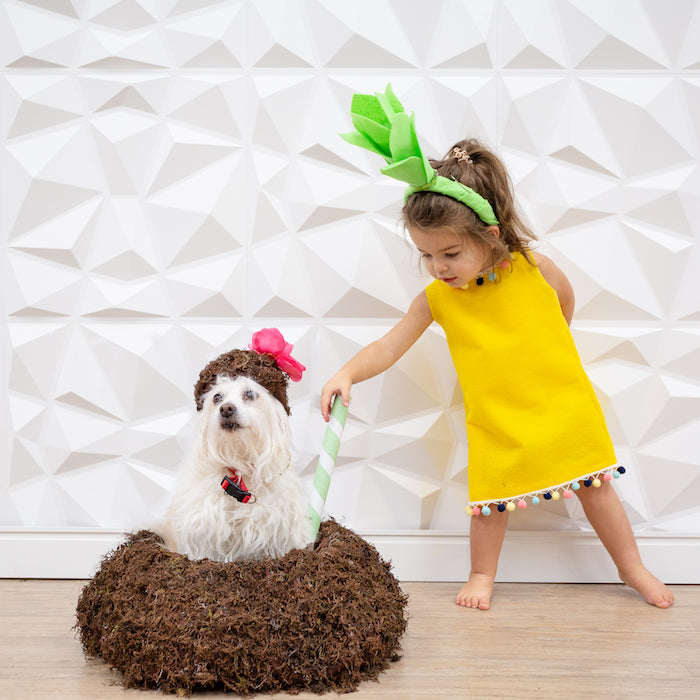
Are you ready for cuteness overload? I teamed up with Aleene's to create a no-sew non-alcohol (I am pregnant and this is for kids) Piña Colada Costume! My daughter Lily was transformed into a pineapple and my pup Tate made for the furry coconut! No pup no problem! Swap out the pup for a baby or toddler. Swap both kids for two pups! Or make it an adult costume!
Pineapple Costume
Materials:
- Aleene's Fabric Fusion Dual-Ended Pen
- Yellow Felt
- Green Felt
- Pom-Pom Trim
- Straight Pins
- Velcro
- Headband
- Sequin Trim
- Craft Roll
- Green Paint and Paint Brush
- Scissors
- Pencil
Directions:
- Double the yellow felt and use a pencil to sketch the shape of a dress. I used one of my daughter's dresses to sketch the shape and size.

- Cut out both pieces.
- Pin the two pieces of the dress together. Use the Aleene's Fabric Fusion to glue the sides and top of the straps together. I recommend using the fine point side of the pen. Do not glue the bottom, neck, or arm openings together. Let the adhesive completely dry.

- Once the dress seems are dry flip it inside out.

- Cut the back down the center and add velcro so the dress can easily slide on and the tightness can be adjusted.

- Glue the pom-pom trim to the neckline and the bottom hem.

- While the dress dries get started on the headband. Cut a strip of green felt.
- Wrap and glue the strip of felt around the headband.

- Cut out leave shapes from the felt.
- Paint the craft roll green (optional).
- Glue the felt leaves to the craft roll to form the stem of the pineapple.

- Add sequins or ribbon around the base of the leaves. This gives you a nice clean finish.
- Glue the leaf stalk to the headband and let it dry.

Coconut Costume
Materials
- Aleene's Fabric Fusion Dual-Ended Pen, Tacky Glue and Decoupage
- Tin bucket
- Brown Felt
- Pipe Cleaners
- Poly-Fil
- Moss
- Brown Paint
- String
- Craft Paper
- 1 Balloon
- Paint Brush
- Scissors
- Tropical Faux Flower
Directions:
- Cut enough felt to wrap the bucket. You will need to choose a bucket that your pup or child will fit in.
- Use the Aleene's Tacky Glue to glue pipe cleaners around the bucket to form a rounded side.

- Stuff the poly-fil inside the rounded pipe cleaners around the bucket.

- Use the Aleene's Tacky Glue to wrap and glue the felt around the bucket.

- Use the brown paint to dye the moss. Lay the moss out flat to dry.

- Use the pad side of the Aleene's Fabric Fusion Pen to lightly press and add glue to the felt. Spread over the felt on the outside of the bucket. Stick the brown moss around the bucket. Let it completely dry.


- While the bottom of the coconut is drying get started on the coconut top aka coconut hat.
- Blow up a balloon to about the size of your pup's head.
- Use Aleene's Decoupage to adhere the strips of craft paper around half of the ballon. Let it dry.

- Once it is dry cut a small hole in the balloon and let it deflate. As it deflates carefully pull it away from the decoupaged hat. You are left with a sturdy shell the shape of the balloon.


- Trim the hat with the scissors to create a clean edge.

- Use the Tacky Glue to add strings on the inside of the hat to tie to your pup's head.
- Cover it with felt and glue on the brown moss.

- Glue a tropical flower to the top of the coconut hat.
- Let the hat completely dry.

Overside Straw Prop
Materials:
- Aleene's Tacky Glue
- Cardboard Wrapping Paper Roll
- Construction Paper
- Scissors.
Directions
- Cut the wrapping paper roll to the size you want the straw.
- Cut strips of green and white construction paper.

- Glue the strips around the roll.

Once the coconut is dry, glue the straw into the bottom of the coconut.

TADA! How cute are these two? I definitely needed a Piña Colada after getting these two to stand still for a picture! But I will have to wait till next year after my little one is here! For now, it is non-alcoholic all the way and two cuties for Halloween.
Visit Aleene's website to purchase all the adhesives I used today!
Happy Halloween!!
Lynn :)
This post is sponsored by Aleene's but all thoughts and opinions are my own!
If you love this project feel free to pin it!
