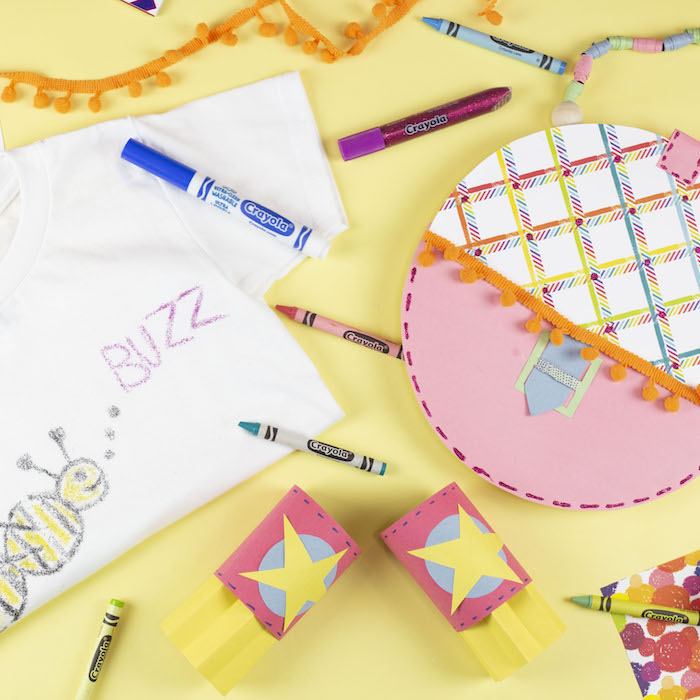
We are still stuck inside and Lily is a very active 3-year old so I am always thinking up projects to keep her entertained. This week on my weekly Crayola Facebook broadcast I am sharing 3 wearable arts and crafts. Who knows these crafts could be the spark your kiddo needs to become a fashion designer!
As a reminder I am live every Tuesday at 1:00pm EST on the Crayola Facebook Page.
All the Crayola supplies I used today can be found on Crayola.com
Project 1: Crayon Sand Paper T-shirt Transfer

*A parent should handle the ironing part of this craft.
Materials:
- Sand Paper
- Crayola Crayons
- White T-shirt
- Iron
Directions:
- Let your kiddos draw a picture on sand paper. Use the non pointed end of the crayon to get a more of the crayon wax on the sandpaper. Have your kids go over their drawing a few times. You want lots of color on the sandpaper. Keep in mind that whatever is drawn will be reversed once it is ironed on the shirt.
- Heat the iron to the cotton setting.
- Place a piece of cardboard in between the shirt.
- Place the sand paper face down on the t-shirt.
- Place iron directly on top of the sand paper and lightly press for 3 seconds.
- Let the sand paper cool before removing.
- Once it is cool, pull the sandpaper up to reveal the design.
To help set your design, after you're finished decorating, we recommend placing the shirt in an old pillow case in an empty dryer. Dry alone on high heat for about 30 minutes. For the first wash, hand wash with cold water and soap, or separate from other clothes on a cold cycle. Hang dry.
How fun are these t-shirts! Lily was a little too young to draw a picture yet but I followed her instructions on exactly what she wanted me to draw - and trust me she knows what she wants.


Project 2: Paper Plate Purse
This is a fun craft for kids who are a little older. The younger ones will need assistance from an adult. This purse is not meant for rough play.

Materials:
- Paper Plate
- Crayola Bright Pop Paper Pad
- Crayola Construction Paper
- Crayola Washable Glue
- Crayola Glue Stick
- Crayola Glitter glue
- Straw
- Scissors
- Trim
- Yarn
- Washi Tape
Directions:
- Trace the top half of a paper plate on a piece of colorful paper from the Bright Pop Paper Pad.
- Pick a coordinating color of construction paper and trace the bottom half of the plate on the construction paper.
- Cut a rectangular piece of construction paper that is 1"x 3". Glue one end to the back of the paper plate and the other end to the half the colorful paper. Fold shut to create the flap of the purse.
- Glue the piece of construction paper to the paper plate to create the pocket part of the purse.
- Glue the trim to the edge of the top flap.
- Cut a buckle from construction paper. Wrap the center of the buckle with washi tape so it does not rip.
- Cut a strap that fits in the buckle. Glue the strap to the back bottom of the top flap.
- Align the buckle with the strap and glue the edges of the buckle to the front of the bottom half of the purse. The strap should thread through the buckle.
- Decorate the purse with glitter glue.
- Next, create paper beads to make the straps.
- Measure 1" from the edge of the 12" side of the construction paper. Cut up and at an angle until it comes to a point at the end of the sheet. The shape will be a thin triangle. Repeat for as many beads at you want and on different color sheets of paper.
- Take the straw and place the wide end of the triangle on the straw and wind around the straw. Once you get to the end place a dot of glue on the point and glue to the roll. Use your finger to smooth out the excess glue.
- Carefully slide the bead off the straw.
- Repeat for all the beads you need.
- Tie a knot at the end of the yarn big enough so that it will not slide through the beads. String the beads on yarn and finish with another knot.
- Glue the ends of the yarn to the back of the paper plate to create the strap.
How cute is this play purse! This could even be a cute gift bag.


Lily was more than happy to put her vogue face on and model it. Oh this little girl!
Tip: If your kids are going to play hard with the purse and want it to last, you might want to laminate the paper pieces before constructing it.

Project 3: Superhero Cuffs
This fun accessory can make make believe play even more fun!

Materials:
- Craft Roll
- Crayola Construction Paper (red, blue and yellow)
- Crayola Glue Stick
- Crayola Markers
- Pencil
- Scissor
Directions:
- Cut the craft roll into two pieces that are about 4" each.
- Cut each of the pieces of the craft roll down the side.
- Cut red construction to the size of each craft roll.
- Draw blue dashes along the sides of each piece of red construction paper.
- Draw two stars and cut each out of yellow construction paper.
- Cut two circles out of blue construction paper.
- Glue one star to one circle and do the same for the other set.
- Glue the star and circle to the red construction paper.
- Glue each set to the craft roll.
- Cut a rectangle out of yellow paper that is 3" x the circumference of the craft roll.
- Accordion fold the rectangle and glue to the inside end of the craft roll.
Now it's time to pick a power and save the world! My daughter loves superheros so this craft was her fav and she was so excited to put on the super hero cuffs and be Super Lily!!!!

Don't forget to tune into my facebook live broadcast on the Crayola Facebook Page every Tuesday at 1:00pm EST.
Happy Crafting!
xoxo- LL