Who loves space? It's time to have a crafty space themed adventure. My daughter, Lily had a blast at her school summer camp when they had a space themed week. She is a little young to fully understand space but she was definitely very intrigued. This week is space week and we are celebrating on my Crayola Facebook broadcast with 3 space themed crafts.

You can shop all the Crayola products I used today on Crayola.com
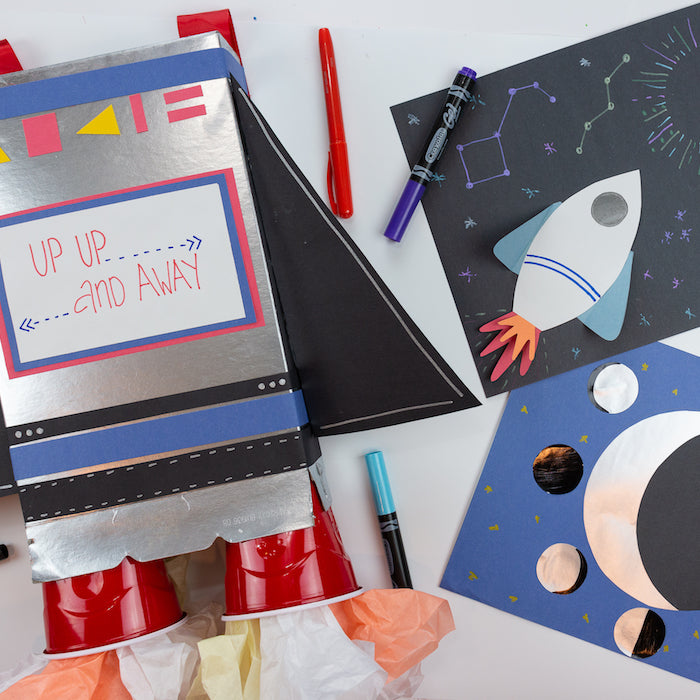
Project 1: 3D Rocket Ship Space Art
Materials:
- Crayola Construction Paper
- Crayola Gel Markers (these are magic)
- Crayola Glue Stick
- Crayola Markers
- Scissors
- Pencil
- A Plastic Cup (to trace)

Directions:
- Draw and cut out the body of a rocket ship on white construction paper. Cut wings for the rocket ship and flames to come out of the end on red and orange paper.
- Using your markers to draw window on the rocket ship and stripes.
- Glue the wings and the fire to the rocket ship. Only glue the ends of the fire and do not glue the orange and red pieces of fire together. We want to leave these unglued for a 3D effect.
- Next, glue the rocket ship to a black piece of construction paper. Only put glue on the box of the rocket ship. Do not glue the wings or the fire. Once the body is glued carefully lift and bend the rocket ship wings and fire up away from the paper to make them 3D.
- Place a cup in the top corner on the paper and draw lines and dashes coming out from the cup using the Gel Markers. Make sure to do it all the way around the cup. This can represent the moon or the sun. Remove the cup and you will be left with a negative space circle.
- Use the Gel Markers to draw constellations and stars.
This is a fun project to let your kids imagine space or practice drawing and learning constellations.

Project 2: Phases of the Moon Sliding Craft
Materials:
- Crayola Construction Paper (Silver, Blue, Black)
- Crayola Markers
- Crayola Metallic Markers
- Crayola Washable Glue
- Pencil
- Scissor
- Ruler
- Something Small and Round to Trace (I used a roll of tape)
- Small Paper Plate or a Circular Item Approximately 6"

Directions:
- Place the 6" circular item in the center of the blue paper, trace and cut it out.
- Take the circle you just cut out, fold it in half and cut it in half.
- Take the half of the circle and place the round edge on the edge (9" side) of the construction paper. Trace it.
- Using a ruler to draw straight lines from the ends of the half circle all the way to the other side. Cut out this shape and set aside.
- Take the silver piece of paper and glue it to the back of the blue piece that you cut a circle out of. Only glue along the top and the bottom of the 12" side. Leave the two 9" sides unglued.
- Take a second sheet of silver paper and trace the small circular item (I used a roll of tape) 8 times and cut out 8 circles.
- Use a black marker to color each circle with the different phases of the moon. You can refer to the chart below from Nasa. I only included 1 new moon on my chart.

- Glue the moons around the circle on the blue construction paper.
- Use the metallic markers to draw starts around the page.
- Take the black shape you cut out earlier and slide in between the open ends of the silver and blue sheet. You can slide through the page to create the phases of the moon.
This is a really fun craft for your kids to learn about the moon!

Project 3: Cereal Box Rocket Jetpack
I originally made this for Lily to wear to dress up at summer camp when it was space week! I made her a matching nasa dress too!

Materials:
- Empty Cereal Box
- Crayola Acrylic Paint (optional)
- Crayola Construction Paper
- Crayola Metallic Markers
- Crayola Washable Liquid Glue
- Crayola Glue Stick
- Strong adhesive (hot glue or a permanent glue)
- Ribbon
- 2 Solo Cups
- Tissue Paper (orange, yellow, white)
- Scissors
- Pencil
- Ruler

Directions:
- Start with an empty cereal box leaving the one end open. You can either paint the box with acrylic paint or cover it by gluing construction paper around it.
- Next cut triangle shaped wings out of black construction paper.
- Cut strips and shapes to decorate your jet pack. I used strips of construction paper to create stripes at the top and bottom and cut out triangle and rectangle shapes to create buttons for my jetpack. Glue to the top and bottom of the front of the box. Keep in mind the open end of the box will be the bottom.
- If you want to add a message to your jetpack like I did cut out a rectangle sheet of construction paper, use markers to write the message and glue to the center of the front of the box.
- Glue the wings to the side of the box.
- Take the solo cups and squeeze a line of liquid glue around the inside of the cup. Glue pieces of tissue paper inside the cup. This is your jetpack fire to fly. Do this on both cups and let dry.
- Cut 2 pieces of ribbon long enough to be straps. Glue them to the back of the box and let dry using a permanent glue.
- Glue the solo cups to the inside of the box using a permanent glue.
- Let everything on the jetpack dry for a few hours before your kiddos play with it.
Who is ready to put on their jetpack and fly to the moon!!!

Happy Space Week!
Lynn :)