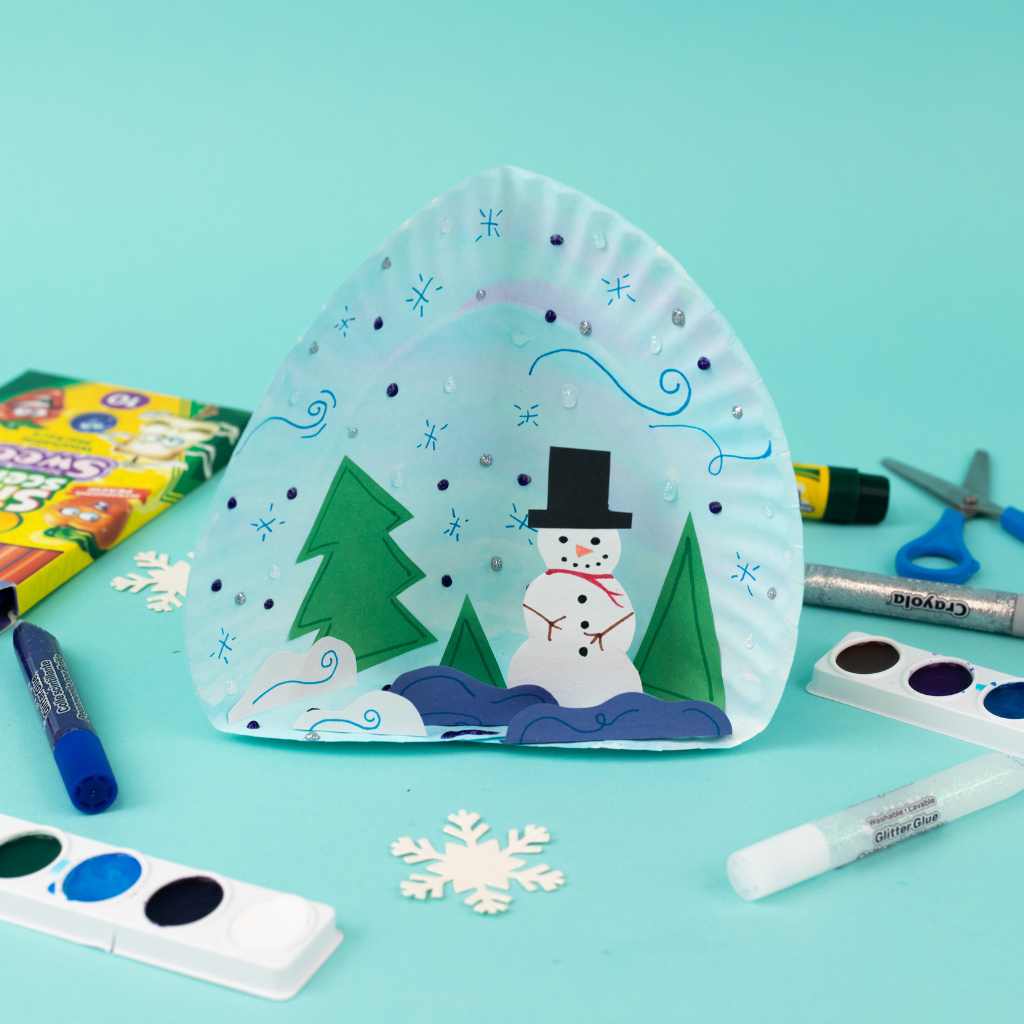
Project Name: Paper Plate Winter Wonderland
Project Difficulty: Intermediate
Project Materials:
- Silly Scents markers
- Construction paper: blue, green, and black
- White paper from your marker and watercolor pad
- Watercolor paint set
- Scissors
- Pencil
- Glitter glue: silver, blue, and clear
- 1 paintbrush
- Stapler
- Liquid washable school glue
- Glue stick
- Paper towel
- Cup of water

Project Instructions:
- We are going to dip our paintbrush in the water, add it to the blue watercolor and paint a wintery blue sky on the top of our paper plate. Remember if you want a lighter color you can add a little water. Add in some purple now. We want to make sure we cover out whole paper plate.

- Set aside and let dry.
- Fold your paper plate in half and make a crease in the middle so we can see where the center is.

- Fold your paper plate just halfway up to the halfway mark.

- Cut the center part of that bottom part you just folded and now you have 2 flaps on the bottom.


- Bring those 2 flaps together and staple so you now have a base for your winter scene.


- Next we are going to make our snowman. Grab your white piece of paper and pencil.
- First draw your snowman starting from the bottom and cut out. Remember the bottom circle is biggest, middle is slightly smaller and the snowman head is smallest. Set aside.
- Let's draw a couple piles of snow next with your extra white paper. Cut out. Set aside.
- Next grab your black sheet of paper. Place the top of your snowman right on the edge of your paper. Draw a hat with your pencil on the black sheet. Cut your hat out.
- Next grab your green paper and green marker. We are going to make some trees. Let's make 3. You can choose any shape you want for your trees. Cut your trees out.
- Next let's grab our blue construction paper to make some blue piles of snow. Draw 2 piles of snow with your marker or pencil and cut out.


- Let's glue our top hat on with our glue stick.
- Grab your silly scents markers and draw your snowman however you would like! You can add the face and the buttons and the arms, whatever you choose!

- Take your blue marker and draw some squiggly lines on your all of your snow piles. So it looks like the snow is blowing through now!
- Now we are going to put our winter scene together.
- To get these to stand up and pop up 3D we are going to fold a flap on the bottom to glue.

- Let's start with our snowman. Fold over a tiny bit of the bottom and apply your glue. Glue to the base so he is standing up.
- I am gluing two trees directly to the back of the scene with my glue stick and one to the base. Remember you can choose where you want to place these things.
- Now glue one pile of snow right at the base of the tree on the background.
- Our last tree will stand up. So fold a tiny bit of the bottom to glue to the base.
- The rest of our snow will be 3D on the base too. Fold down a tiny bit of the bottom and glue to your base.

- Now we get to decorate. Grab your glitter glue and silly scents markers.
- Draw some squiggly lines with your blue silly scents markers. Maybe some snowflakes. Make some dots with your glitter glue. You can add what you choose to the background :)

Remember, you can create your own scene for any holiday or season!